Solar Panel Wiring Guide: How to Connect Your System
Solar Panel Wiring Guide: How to Connect Your System
Solar Panel Wiring Guide: How to Connect Your System
Veröffentlicht: November 5, 2025
AKTUALISIERT AM: November 1, 2025
Table of Contents
Installing solar panels is one of the best investments for achieving energy independence — but the wiring setup determines how well your system will actually perform. Whether you’re connecting two panels or an entire rooftop array, proper wiring ensures efficiency, safety, and long-term durability. In this solar panel wiring guide, we’ll walk you through the essentials of solar panel wiring, from understanding connection types to choosing the right components and avoiding costly mistakes.
Why Proper Solar Wiring Matters
The wiring in your solar system is the critical link between power generation and usable electricity. Faulty or undersized wiring can lead to energy loss, overheating, or even electrical hazards. A clean, well-planned wiring setup ensures maximum efficiency and system longevity.
Many DIY installers underestimate how much difference high-quality connectors, cables, and junction boxes make. To simplify this step, AceFlex offers Wiring Essentials Packages that include all the necessary components for a safe and efficient solar connection.
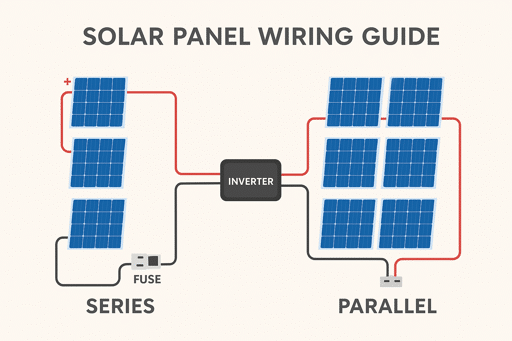
Understanding the Basics — Series vs. Parallel Connections
Before connecting your panels, it’s important to understand the two main wiring configurations:
Series Wiring When solar panels are wired in series, the voltage adds up while the current stays the same. This setup is ideal when you need higher voltage to match inverter specifications or minimize energy loss over long cable runs.
Parallel Wiring In parallel connections, the voltage remains the same, but the current increases. This method is preferred for systems where panels receive varying sunlight (e.g., partially shaded roofs).
Series-Parallel (Hybrid) Larger solar arrays often combine both methods to balance voltage and current levels for optimal performance.
Pro Tip: Always confirm your inverter’s input voltage range before deciding how to wire your panels.
Key Components You’ll Need
A complete solar wiring setup includes more than just panels and cables. Here’s what you’ll typically need:
Solar Panels – The energy source
Junction Box – Such as the EZ Solar Rooftop PV Junction Box (JB-1.XL) for rooftop safety and easy connections
Solar Cables & MC4 Connectors – Ensure weatherproof, secure connections
Inverter or Microinverters – Convert DC power to AC for home use
Charge Controller (Off-Grid Systems) – Protects batteries from overcharging
Grounding Equipment & Fuses – Critical for safety and compliance
Step-by-Step Solar Panel Wiring Process
Follow these core steps to wire your solar panels safely and efficiently:
Plan Your Layout – Sketch your roof layout, cable paths, and inverter location.
Choose Wiring Method – Determine whether series, parallel, or hybrid wiring fits your inverter specs.
Connect Panels – Use MC4 connectors to link panels securely, ensuring proper polarity.
Install Junction Box and Safety Devices – Place the junction box in a shaded, accessible spot.
Connect the Inverter – Follow manufacturer guidelines for DC input connections.
Ground the System – Use grounding lugs and wires according to local code.
Test Before Activation – Use a multimeter to confirm voltage and polarity before switching on.
Safety Tip: Always work on a de-energized system and use insulated tools. For grid-tied systems, a licensed electrician should verify final connections.
Even a well-planned solar installation can run into performance issues if the wiring isn’t done correctly. Many DIY installers make small but critical errors that reduce efficiency or compromise safety.
One of the most common mistakes is mixing different solar panel models or power ratings within a single string. This creates electrical imbalances that reduce the system’s overall output. Another frequent issue is using the wrong wire gauge — cables that are too thin can cause voltage drops and overheating, while oversized cables are unnecessarily costly and difficult to manage.
Installers sometimes skip proper grounding or surge protection, assuming it’s optional. In reality, grounding protects both your system and your property from electrical faults and lightning surges. Exposed or loosely connected MC4 connectors are another hazard — they allow moisture to enter, leading to corrosion and power loss over time.
Finally, many overlook their inverter’s input voltage limits when wiring panels in series. Exceeding these limits can permanently damage the inverter or void its warranty. Taking the time to verify every connection and voltage value before powering up is essential to ensure long-term performance and safety.
Pro Tips for a Clean & Efficient Wiring Setup
A professional-looking solar installation isn’t just about aesthetics — it’s about reliability and maintainability. Start by using pre-terminated cables whenever possible; they save time, ensure proper polarity, and minimize connection errors. Always label your cables clearly to make future maintenance or system expansion straightforward.
Keep your wiring neatly bundled and secured with UV-resistant cable ties to prevent wear from sun exposure and wind movement. Routing cables along rails or under the array also helps protect them from damage and maintains a clean appearance.
Choose high-quality, weatherproof junction boxes to shield electrical connections from rain and temperature changes. The EZ XL Rooftop PV Junction Box (JB-1.XL), for example, provides professional-grade protection for rooftop installations and is a standard component in every AceFlex Wiring Essentials Package.
By following these best practices, you’ll not only improve system efficiency but also ensure a long-lasting, low-maintenance solar setup that performs safely for years to come.
Before energizing your system, double-check all connections. Use a multimeter to verify voltage, polarity, and continuity. Make sure fuses and disconnect switches are properly rated for your system.
If you’re unsure about local electrical codes or grid connection standards, consult a certified electrician — it’s a small step that ensures full compliance and peace of mind.
Conclusion – Solar Panel Wiring Guide
Wiring your solar system correctly is just as important as choosing the right panels or inverter. A clean, well-organized wiring setup not only ensures maximum energy efficiency but also protects your system from electrical faults, voltage drops, and long-term wear.
By understanding the basics of series and parallel wiring — and by using quality components — you can build a reliable solar installation that delivers consistent performance for years to come.
For DIY homeowners and installers looking for a ready-made solution, AceFlex Wiring Essentials Packages offer all the key components you need. Designed for safety, compatibility, and durability, these packages make your installation faster, cleaner, and fully compliant.
👉 Power your solar project with confidence — explore AceFlex’s onlineshop and find your optimal solar equipment.
FAQ – Solar Panel Wiring Guide
How should solar panels be wired?
Solar panels can be wired in series, parallel, or a combination of both, depending on the desired system voltage and current. Wiring in series increases the voltage while keeping the current constant, making it ideal for longer cable runs. Wiring in parallel keeps the voltage the same but increases the current, which is useful for off-grid systems or setups with lower-voltage inverters.
Can a 200 watt solar panel run a 12 volt refrigerator?
Yes, a 200W solar panel can run a small 12V refrigerator, but only under optimal sunlight conditions and with the support of a properly sized battery and charge controller. On average, a 12V fridge consumes 30–50Ah per day, so continuous operation typically requires energy storage to cover nighttime and cloudy periods.
Is it better to have 2 100W solar panels or 1 200W?
Functionally, both setups deliver similar power output, but two 100W panels offer more flexibility in placement and are easier to transport or replace individually. However, a single 200W panel reduces wiring complexity and potential power losses at connections, making it a cleaner setup if space and handling aren’t an issue.
How many amps can a 200 watt solar panel put out?
A 200W solar panel typically produces around 10–12 amps under ideal conditions when connected to a 12V system. The exact current depends on sunlight intensity, panel efficiency, and temperature. For accurate system design, always refer to the panel’s datasheet for its rated short-circuit current (Isc) and maximum power current (Imp).
Can I mix 100W and 200W solar panels?
Mixing panels of different wattages is possible but not recommended, as mismatched voltage and current outputs can cause inefficiency or power loss. If panels must be mixed, ensure they have similar voltage ratings and use an MPPT charge controller to help balance the power difference between panels.
What is the 156% rule in solar?
The 156% rule refers to the National Electrical Code (NEC) guideline that states solar conductors must be sized to carry 156% of the system’s maximum current. This safety factor ensures that wiring can handle current fluctuations and prevent overheating, contributing to long-term system reliability and compliance with U.S. electrical standards.
How do I know if my solar panels are wired correctly?
You can verify correct wiring by checking voltage and polarity with a multimeter. In a series connection, voltages should add up; in parallel, voltage should match a single panel. Additionally, ensure all connections are tight, properly insulated, and free from corrosion or loose terminals. Following a detailed solar panel wiring guide helps ensure safety and optimal system performance.
What happens if solar panels are wired incorrectly?
Incorrect wiring can lead to power loss, inverter faults, or even equipment damage. Reversed polarity may trigger safety shutdowns, while mismatched connections can reduce system efficiency. Always follow the manufacturer’s wiring diagrams or consult a certified solar technician before commissioning the system.
How far can solar panels be from the battery?
The distance between solar panels and the battery depends on wire size and voltage. Longer distances require thicker cables to prevent voltage drop. For example, at 12V systems, a 3% voltage drop limit is ideal; using higher voltages like 24V or 48V allows for longer cable runs with smaller wire gauges.
Do solar panels need to be grounded?
Yes, grounding solar panels is essential for both safety and compliance with electrical codes. It protects your system from lightning strikes, static discharge, and electrical faults. Proper grounding involves connecting the metal frame of the panels and mounting structure to a common earth ground using approved grounding conductors and lugs.
Switching to a home solar system 2026 is no longer a trend — it’s a smart investment. As energy prices rise and sustainability becomes more urgent, many homeowners are turning