Thinking about going solar on your own terms? A DIY solar project can be one of the most rewarding home upgrades you’ll ever make. Whether you’re looking to cut electricity bills, gain energy independence, or reduce your carbon footprint, planning your own project solar installation gives you full control—without breaking the bank.
At AceFlex, we make it easier than ever to design and build your own solar system. With the right components, a little know-how, and some planning, you can install a high-performance solar array that rivals professional setups—at a fraction of the cost.
In this guide, we’ll walk you through every step to confidently plan your own project solar setup from scratch—tailored to your roof, your energy goals, and your budget.

Before you start ordering panels or sketching layout ideas, you need to get crystal clear on one thing: how much energy do you actually need?
Understanding your energy goals is the foundation of any successful project solar installation. Here’s how to break it down:
Start by reviewing your electricity bills—ideally from the past 12 months. Look for the total kilowatt-hours (kWh) used per month. This gives you an annual average to work with and helps size your system accurately.
➡️ Pro tip: In the U.S., the average household consumes about 10,000–12,000 kWh per year. But your needs could vary based on home size, climate, and appliances.
Do you want to:
Your answer will shape everything from panel quantity to battery sizing.
Are you planning to buy an EV soon? Add a heat pump? Your project solar system should account for potential upgrades.
Once you know how much energy you want to generate, it’s time to see where your solar system will live. Your roof—or available outdoor space—plays a crucial role in the success of your project solar installation.
➡️ Not sure if your roof is ideal? Our AceFlex Premium Solar Kit includes a full K2 Systems mounting report tailored to your home.
Trees, chimneys, and even neighboring buildings can block sunlight and reduce system efficiency. Use tools like the SunCalc app or consult a shading analysis to evaluate your site.
You’ll need roughly 100 sq ft per 1 kW of solar panels. If you’re planning a 6 kW system, that’s about 600 sq ft of usable roof area.
➡️ Panels like the Trina or Axitec are compact and powerful—ideal for tight rooftops.
🔗 Explore Our Solar Panels Category
Ensure your roof is:
If you’re unsure, consider getting a roofer or structural engineer to check it out before installation.
With your energy goals set and your roof evaluated, it’s time to choose the right components to bring your project solar installation to life. This is where the performance, efficiency, and long-term value of your system are determined.
Start by selecting high-efficiency solar panels that fit your space and budget. Consider:
AceFlex offers a curated range of U.S.-compliant panels.
Each option is designed for long-term durability and high output, even in partial shade conditions.
The inverter is the brain of your solar system. It converts DC energy from the panels into usable AC power for your home.
Options include:
Popular models in our shop include SolarEdge, Enphase, and Sol-Ark inverters.
Looking for a streamlined solution? Our Solar Kit Basic is a great starting point, offering flexibility to select your preferred panels, inverter, and wiring—ideal for flat or simple pitched roofs.

🔆 Basic Solar Kit – Your Custom Solar System in 6 Guided Steps
Design your own solar setup with full flexibility: choose solar panels, inverter, battery, wiring essentials, combiner, and accessories – all fully compatible and guided step by step.
✅ Choose only the components you need
✅ DIY-friendly & pre-checked for compatibility
✅ 🎁 Battery discount included when bundled
Your mounting system must match your roof type and panel layout. Choose between:
AceFlex Solar Kits include pre-selected mounting kits from K2 Systems, tailored to flat, pitched, and metal roofs.
Need a more complete package with pre-selected mounting gear? The Solar Kit Standard includes everything from the Basic Kit plus a pre-configured K2 mounting system—perfect for a faster, more guided installation process.
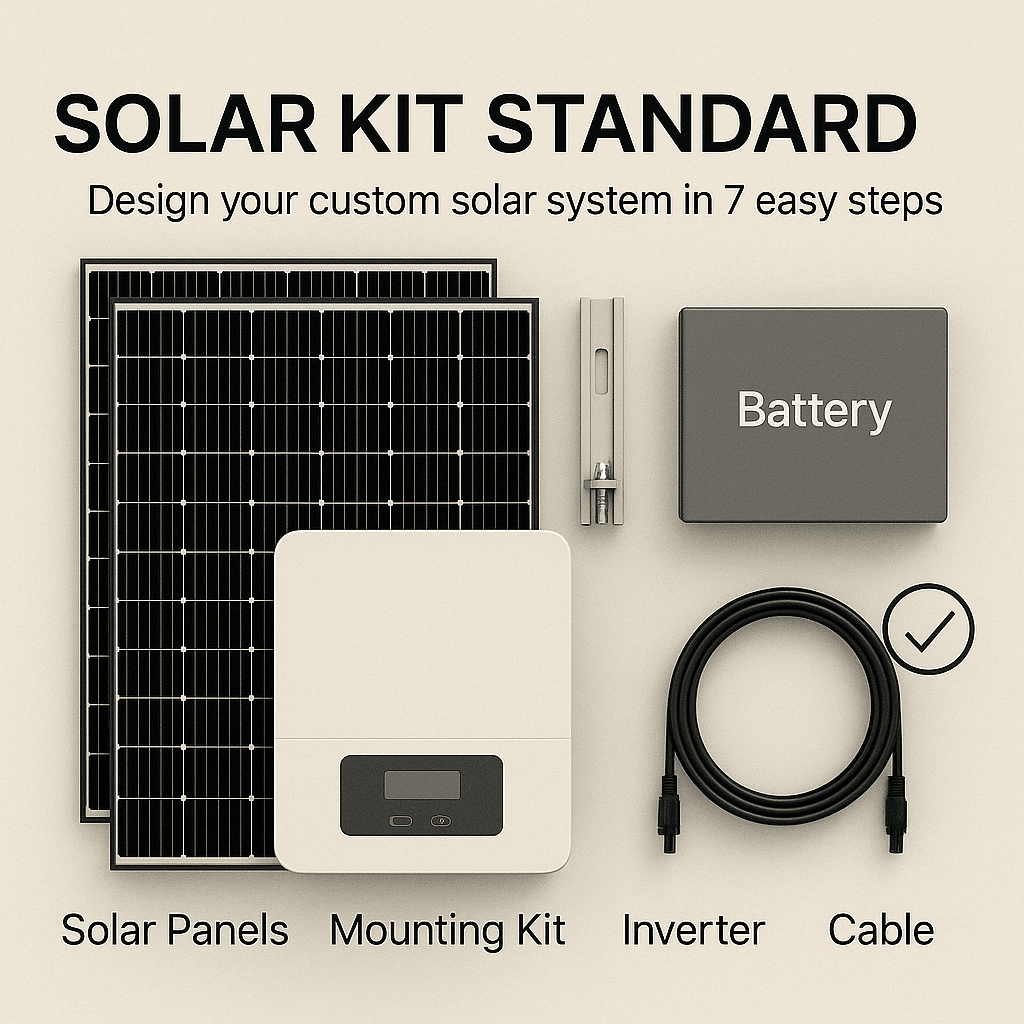
🔆 Standard Solar Kit – Your Custom Solar System in 7 Guided Steps
Design your solar setup with full flexibility and pre-configured mounting: choose solar panels, inverter, battery, mounting kit, wiring essentials, combiner, and accessories – all step by step and fully compatible.
✅ Includes mounting material from K2 Systems for standard layouts
✅ Choose only the components you need
✅ DIY-friendly and pre-checked for compatibility
✅ 🎁 Battery discount included when bundled
Add a lithium battery for backup power, load shifting, or off-grid operation. Consider options like the Fortress Power eFlex 5.4 or Enphase IQ Battery 5P for safe, scalable storage.
Wiring is the invisible backbone of your solar installation. A solid wiring plan ensures that your system operates efficiently, safely, and in full compliance with U.S. electrical codes.
Most solar systems generate DC (direct current), which is then converted to AC (alternating current) by the inverter. Your wiring plan needs to address:
AceFlex offers ready-made Wiring Essentials Packages—available in Small, Medium, and Large—that include key components like:
These packages are designed to meet NEC requirements and simplify your installation.
A compliant solar setup must include:
Some utilities also require a revenue-grade production meter or smart monitoring integration.
Tip: If you’re not familiar with electrical safety standards, we strongly recommend working with a licensed electrician for final connections, especially for grid-tied systems.
Even the most well-planned solar installation needs to comply with local regulations. Before installing your system, make sure you handle all required permits and utility approvals to avoid delays or legal issues.
Most U.S. municipalities require one or more of the following:
Contact your local permitting office early in the planning process to learn:
Tip: Some jurisdictions offer online permitting for solar systems, which can speed up the process significantly.
If you live in a neighborhood with a Homeowners Association (HOA), check whether exterior modifications like solar panels require prior approval. Similarly, make sure your system doesn’t violate zoning regulations regarding height, setback, or aesthetics.
For grid-tied systems, you must apply for interconnection approval with your local utility. This typically involves:
Once approved, your system can send excess power back to the grid—often earning you credits through net metering, where available.
Important: Utilities vary widely in their approval process and timeline. Factor this into your project schedule.
With your components selected, permits approved, and utility paperwork in motion, it’s time for the final step: installation. This is where your project solar vision becomes a working reality.
Depending on your system type and roof complexity, installation typically includes:
AceFlex Solar Kits include detailed component guides—and our Premium Kit comes with a custom K2 Systems mounting plan for even more precise guidance.

🔆 Premium Solar Kit – Your Custom Solar System in 7 Guided Steps
Design your solar setup with full flexibility and professional support: choose solar panels, inverter, battery, custom mounting kit, wiring essentials, combiner, and accessories – all step by step and fully compatible.
✅ Includes custom K2 mounting kit with professional layout planning
✅ Personalized K2 Report for your roof and module configuration
✅ DIY-friendly & pre-checked for compatibility
✅ 🎁 Battery discount included when bundled
Note: While many steps of the installation can be handled by a confident DIYer, the final AC connection to your main panel should always be performed by a licensed electrician.
Once the system is connected and inspected (if required), your utility may give permission to operate (PTO). After that, you’re ready to go live.
Power production typically starts immediately, especially on grid-tied systems.
Most modern inverters include web portals or smartphone apps that show real-time:
Popular monitoring platforms include:
Monitoring is essential to ensure your system operates efficiently and detects any drop in performance early on.
Planning your own solar installation doesn’t have to be overwhelming. With the right tools, trusted components, and a clear step-by-step plan, you can take control of your energy future—on your own terms.
At AceFlex, we specialize in helping homeowners and DIY enthusiasts bring their project solar ideas to life. Whether you need a simple starter kit or a fully customized solution with structural planning and battery storage, we’ve got you covered.
Explore our full range of Solar Kits, Panels, Inverters, and Wiring Packages—all carefully curated for U.S. compliance and easy installation.
Start building your solar system today and enjoy:

While many parts of a DIY solar installation—such as mounting panels and running DC wiring—can be done by a skilled homeowner, the final AC connection to your main service panel must be performed by a licensed electrician in most U.S. states. This ensures compliance with code and avoids safety risks.
Yes. The federal Investment Tax Credit (ITC) allows homeowners to deduct a percentage of their solar system costs from their federal taxes—even if the system is self-installed. Local incentives may also be available depending on your state. Always keep detailed receipts and consult with a tax advisor.
This post references the former 30% Federal Solar Tax Credit. For current rules and guidance on solar after the federal tax credit , please read our updated overview.
It depends on your system design. Microinverters (like Enphase) are ideal for complex or shaded roofs. String inverters (like Fronius or SolarEdge) are cost-effective for open, unshaded layouts. Hybrid inverters (like Sol-Ark) are best if you plan to integrate battery storage.
For DIYers, a basic 5 to 10 kW system can often be installed over one or two weekends. More complex installations with batteries or structural adjustments may take longer. Make sure you allow time for permitting and utility approval, which can add several weeks.
Yes. Most solar systems are scalable. If you anticipate future upgrades (like an electric vehicle or heat pump), choose an inverter and mounting layout that allows easy expansion. At AceFlex, we help customers plan for long-term flexibility from the start.